It's Soil Sampling Season
Katelyn Miller, Field Crops and Forage Specialist
Southwest New York Dairy, Livestock and Field Crops Program
Soil testing is the building block of any fertilizer management program. Testing allows you to evaluate your pH, organic matter, and various macronutrient and micronutrient levels in your soil. When paired with crop trial data, the soil test results can be used to determine specific, crop based, nutrient applications that are profitable and environmentally sound. Fall is a popular time of year to take soil samples, so let's discuss how to get your soil from the field and into the lab for analysis.
First, you must decide where you are going to send your soil samples. In New York State, the most reliable extraction method based on our soil types is Morgan, and all fertility recommendations are based on this. In New York State, the most common lab is Dairy One, and all samples submitted contain recommendations derived from Cornell fertility guidelines. Regardless of if you decide to send samples to Dairy One or a different provider, always send samples to the same lab to receive consistent results. All the information in this article is based on submitting samples to this lab; for more information visit https://dairyone.com/services/agronomy-services/soil-analysis/.
Once you decide which lab you will send your samples to, you must take the sample. To do so, there are a couple different factors involved:
Using the right tools: Soil probes are often the best tools to use for sampling because they can collect soil in a continuous core and create minimal soil disturbance. If you have rocky soil, an auger may work better as rocks can lodge inside the probe. These tools can be expensive, so a spade or shovel can also be used to take samples, but additional care is needed to avoid over/under sampling. Ensure that your equipment is clean and collect all cores into a bucket.
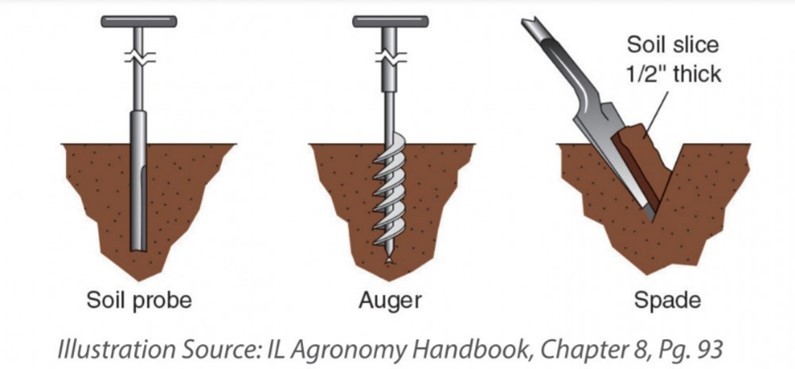
Sampling at the right depth: Before removing the soil, ensure that debris is removed from the surface. Additional residue can alter sample results. Different management systems can require different protocols:
- Under conventional tillage, sample the top 8 inches.
- In pasture/hayfields, sample the top 6 inches.
- In no-till/minimum till systems, two separate samples should be taken. First, sample the top inch of soil, then take another sample of the top 6 inches. The 1-inch sample is taken to timely determine pH decline because stratification does not occur in no-till systems.
Sampling in a pattern: One sample should represent 15 acres or less of similar management history. Fields that have different crop history, fertility management, slope, and crop growth, should be sampled separately. Take samples in a zig-zag pattern throughout the field. A rule of thumb is to multiply the total acreage of the field by 2 to estimate the number of cores to take. Smaller fields should have 10 cores taken at a minimum.
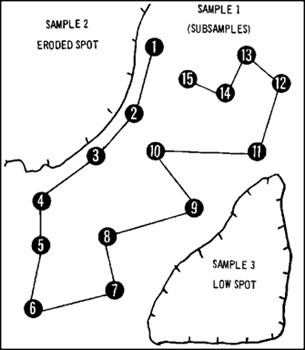
Avoiding abnormal areas: While sampling in the zig-zag pattern, be sure to avoid areas that are not a representation of the entire field. This includes furrows, windbreaks, fence lines, places where manure or lime piles were placed, fertilizer bands, severely eroded slopes, or near burn piles. Sampling in these areas will give you a result that is not representative of the field and will skew results.
Now that the field has been sampled, you should have a bucket with soil in it. Break down any clumps, remove rocks, excess debris, and place 2-3 cups of soil into a labeled bag that corresponds to the name used on the paperwork. You can use sandwich bags, paper bags, or you can pre-order sample bags. If the sample is extremely saturated, lay the soil out so it can dry at room temperature before placing it into a bag for shipping.
The next step is to fill out the paperwork. For results specific to pastures and field crops, Form A is used: https://dairyone.com/download/agronomy-submission-form-a/?wpdmdl=13838&masterkey=5d0a659f9ca40. The corresponding crop codes are listed on pages 3 and 4. Be sure to fill out the name of the sampled field, prior and future crop information, and the soil name. You can determine your soil type from the USDA-NRCS Web Soil Survey site. Here is a video that breaks down how to identify your fields soil types: https://www.youtube.com/watch?v=yl2T8DCyY1Y&t=38s.
Once you have completed all these steps, you are able to ship out your samples. For a basic soil sample test, it costs $18/sample plus shipping costs. Samples are shipped via any carrier of your choice, and are shipped to 730 Warren Road, Ithaca NY 14850. You can also request discounted pre-paid mailing labels from the lab directly.
Some important things to remember when you are sampling:
- You should sample approximately every 3 years. Sampling this often will allow you to refine management decisions, especially when planting a different crop in your rotation.
- The results you get are only as good as the samples you send in. Make sure the samples you send in are to the proper depth and are a representative sample.
- Consistency is key. Take samples the same time of year and always send them to the same lab.
For more information about soil testing or report interpretation, please reach out to Katelyn Miller at 716-640-2047 or you can contact one of your county's wonderful Extension agents for assistance!
Upcoming Events
Boots in the Barn: Cornell Dairy Research Updates
January 13, 2026
January 20, 2026
January 27, 2026
February 3, 2026
February 10, 2026
February 17, 2026
February 24, 2026
Join us for some or all!
New York Certified Organic (NYCO) Field Crops and Dairy Meeting
February 10, 2026
Geneva, NY
Piglet Health 101
February 13, 2026 : Piglet Health 101 - Batavia, NY
Batavia, NY
This free workshop from the New York Pork Producers offers hands-on training in essential piglet care and processing practices, led by industry veterinarians from Passion for Pigs. No matter your experience level, this training offers takeaways for both new and experienced producers.
Announcements
Cows, Crops & Critters Newsletter Sponsorship
TRYING TO REACH GROWERS AND AGRIBUSINESSES IN OUR SOUTHWEST REGION OF NEW YORK?Weekly Email Update: Shared with 625+ households who have signed up with our program.
Monthly Paper Mailer: To reach our stakeholders and farmers who lack internet access, we send out a monthly mailer where your company's logo and contact information would be featured with a mailing list of 330+ households.
If you sponsor our weekly and monthly publications you reach approximately 955 households.

